- Resetting All Global Settings
- Global Settings > Preferences
- Global Settings > MIDI/Tempo
- Global Settings > Footswitches
- Global Settings > EXP Pedals
- Global Settings > Displays
- USB Audio
- Hardware Monitoring vs. DAW Software Monitoring
- ASIO® Driver Settings (Windows® only)
- Core Audio Driver Settings (Mac® OS X only)
Global Settings
The Global Settings menu contains additional parameters that apply to all setlists and presets, such as input and output levels, custom footswitch mode settings, etc. The upper right corner displays the Helix device's current firmware version.
Visit [line6.com/support][https://line6.com/support) for information on the latest Helix firmware updates.
1. Press MENU to open the Menu.
2. Press Knob 6 (Global Settings).
The Global Settings screen appears:
3. Move the joystick to select one of the six submenus.
If necessary, press < PAGE/PAGE > to view more parameters.
Resetting All Global Settings
Resetting the Helix Global Settings returns them to factory default. Performing this reset does not affect any presets you may have created.
1. From any Global Settings submenu, press ACTION.
2. Press Knob 1 (Factory Settings).
The following dialog appears:

3. Press Knob 6 (OK).
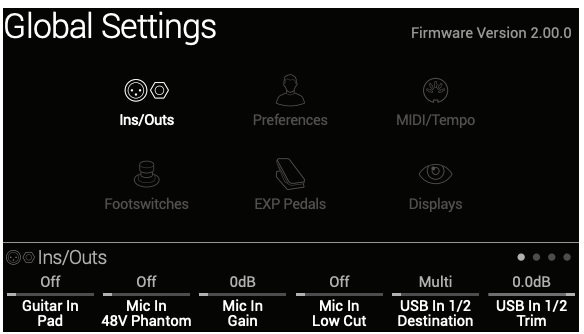
Global Settings > Ins/Outs
Page 1
| Knob | Parameter | Description |
|---|---|---|
| 1 | Guitar In | Pad If your guitar or bass has active or really loud pickups, you may want to turn this on. There's really no rule; use what sounds best. |
| 2 | Mic In | 48V Phantom When on, Helix provides 48V from the XLR Mic In jack to power studio condenser microphones. |
| 3 | Mic In Gain | Sets analog gain for the XLR Mic In jack. |
| 4 | Mic In Low Cut | Sets the frequency of the Mic In's dedicated, variable low-cut filter. Turn fully counter clockwise (or push) to disable. |
| 5 | USB In 1/2 Destination | If you like to jam along with iTunes®, YouTube™ or your DAW, this setting determines from which of the Helix outputs your computer or iPad primary stereo audio stream will be heard. USB In 1/2 bypasses all Helix processing; USB 3/4, 5/6, and 7/8 can be selected as input blocks for processing DAW tracks or re-amping. Normally, you should choose "Multi," which sends USB In 1/2 directly to the 1/4", XLR, and Digital outputs. See "USB Audio". |
| 6 | USB In 1/2 Trim | Sets the level of incoming audio from USB 1/2, which bypasses all Helix processing. Normally, this should be left at 0.0dB. |
Page 2
| Knob | Parameter | Description |
|---|---|---|
| 1 | 1/4" Outputs | Choose "Instrument" when connecting the Helix 1/4" outputs to stompboxes or the front of guitar amps; choose "Line" when connecting to mixers, studio monitors, or standalone recorders. When using a single amp or speaker, connect only the LEFT/MONO 1/4" jack. |
| 2 | XLR Outputs | Choose "Mic" when connecting the Helix XLR outputs to standalone mic preamps or the XLR mic inputs on mixers; choose "Line" when connecting to studio monitors or the line inputs on mixers. When using a mono playback system, connect only the LEFT/MONO XLR jack. |
| 3, 4, 5, 6 | Send/Return 1, Send/Return 2, Send/Return 3, Send/Return 4 | Choose "Instrument" when using a Send/Return pair as an FX loop for stompboxes; choose "Line" when using a Send/Return pair as an FX loop for line-level rack processors, or as additional inputs and outputs for connecting keyboards, drum machines, mixers, and other gear. |
Page 3
| Knob | Parameter | Description |
|---|---|---|
| 1, 2 | Re-amp Src (USB 7), Re-amp Src (USB 8) | USB out 7 and 8 are dedicated for recording a DI signal which can be used for re-amping; choose which two inputs will be sent dry (unprocessed) to your DAW. See "USB Audio". |
| 3 | Volume Knob Controls | Determines which output(s) are affected when turning the top panel VOLUME knob. For example, you may want to control the level sent from the 1/4" outputs to your stage monitor without affecting the XLR level sent to the front-of-house mixer. |
| 4 | Headphones Monitor | Determines which signal(s) are heard from the PHONES output. Normally you would set this to Multi (1/4" + XLR + Digital+ USB 1/2), but there may be a situation where you only want to hear what's sent from the 1/4" or XLR outs, particularly if they are being fed different signals (or band members!) |
| 5 | Digital Output | One digital output can be active at a time; choose S/PDIF or AES/EBU. Connecting an L6 LINK device to Helix automatically disables S/PDIF out. USB audio is not affected by this setting. Also see "Output". |
| 6 | Digital Out Level | Sets the S/PDIF and AES/EBU output level. Normally, this should be left at 0.0dB. |
Page 4
| Knob | Parameter | Description |
|---|---|---|
| 1 | Sample Rate | Determines the sample rate of the Helix S/PDIF and AES/EBU outputs; choose 44.1 kHz (the default), 48 kHz, 88.2 kHz, or 96 kHz. When connecting to another device's S/PDIF or AES/EBU input, make sure both units are set to the same sample rate. Note that this setting does not affect Helix USB audio sample rate operation. |
Global Settings > Preferences
| Knob | Parameter | Description |
|---|---|---|
| 1 | Snapshot Edits | Determines whether or not any edits made to a snapshot (block on/off, parameter control Command Center, tempo) are remembered when returning to that snapshot. When set to "Recall," any snapshot edits are recalled when jumping from snapshot to snapshot, and appear as you last left them. When set to "Discard," any snapshot edits are discarded when jumping from snapshot to snapshot, and appear as the preset was last saved. If you want to save changes made to a snapshot while Snapshot Edits is set to "Discard," press SAVE twice before selecting another. The camera icon on the home screen shows you the Snapshot Edits setting at a glance—When set to "Recall," the camera is gray; when set to "Discard," the camera is red. At any time, hold BYPASS and press SAVE to toggle this setting. Also see "Determining Snapshot Edit Behavior" |
| 2 | Tap Tempo Pitch | Determines how delay repeats behave when repeatedly pressing TAP. "Accurate" respects the natural pitch fluctuations inherent when changing a real delay pedal's time knob; "Transparent" minimizes these artifacts. |
| 3 | Preset Numbering | Determines whether each setlist's presets appear as 32 banks of four (A B C D) or are numbered 000-127 (convenient when recalling presets via MIDI program change messages). |
Global Settings > MIDI/Tempo
| Knob | Parameter | Description |
|---|---|---|
| 1 | MIDI Base Channel | Sets the system base MIDI channel that Helix uses for both receiving and sending MIDI communication via MIDI and USB. Note that MIDI messages assigned from the Command Center page can be set to any MIDI channel. |
| 2 | MIDI Thru | When on, MIDI OUT also acts as a MIDI THRU; that is, it passes through any MIDI messages received at the MIDI IN jack. |
| 3 | MIDI Over USB | When on, Helix receives and transmits MIDI data via USB in the same capacity as its MIDI jacks. |
| 4 | MIDI PC Send/Receive | Determines whether or not Helix automatically sends MIDI program change (PC messages when selecting presets. This setting does not affect any MIDI commands manually assigned from the Command Center page. Also determines whether or not Helix responds to program changes. |
| 5 | Tempo Select | The "Speed" or "Time" parameters of all tempo-based FX can be set to a note value that follows Tap Tempo or the tempo set with Knob 6 (Snapshot BPM/Preset BPM/Global BPM). Choose whether the Helix tempo is stored and recalled with each snapshot, recalled with each preset, or is applied globally across all presets and snapshots. |
| 6 | Snapshot BPM/Preset BPM/Global BPM | This is an alternative way to set the Helix tempo, as opposed to stepping repeatedly on the TAP footswitch. Depending on the Knob 5 (Tempo Select) setting, this value is saved per snapshot, per preset, or globally. The Helix device's tempo has a resolution of 0.1 BPM (beats per minute). You can also quickly access this parameter at any time by briefly touching the TAP footswitch. |
Global Settings > Footswitches
| Knob | Parameter | Description |
|---|---|---|
| 1 | Touch Select | If you don't want Helix to automatically select assigned blocks or items when you touch a switch top, or engage Quick Bypass Assign when you touch a switch top for 2 seconds, set this to "Off." If you play barefoot, you might want to turn this off as well. |
| 2 | Preset Mode Switches | By default, Preset footswitch mode displays eight presets (four on each row). Choose from "8 Presets," "Preset/Stomp" (one bank of presets on the top row, switches from stomp mode on the bottom row), "Stomp/Preset" (switches from stomp mode on the top row, one bank of presets on the bottom row), "Preset/Snap" (one bank of presets on the top row, Snapshots 1-4 on the bottom row), "Snap/Preset" (Snapshots 1-4 on the top row, one bank of presets on the bottom row), "Snap/Stomp" (Snapshots 1-4 on the top row, switches from stomp mode on the bottom row), "Stomp/Snap" (switches from stomp mode on the top row, Snapshots 1-4 on the bottom row), and "8 Snapshots" (Snapshots 1-8). |
| 3 | Stomp Mode Switches | When set to "10 switches," FS1 (BANK ) and FS7 (BANK ) are re-purposed as additional Stomp switches. This is only for Stomp footswitch mode; while in Preset, Snapshot, or Looper footswitch modes, BANK and BANK are retained. |
| 4 | Snapshot Mode Switches | When set to "Auto Return," Helix returns to the previous footswitch mode after selecting a snapshot. When set to "Manual Return," Helix stays in Snapshot footswitch mode until you press FS6 (CANCEL). |
| 5 | Up/Down Switches | When set to "Presets" or "Snapshots," FS1 (BANK ) and FS7 (BANK ) change to PRESET / or SNAPSHOT / , where pressing either switch instantly selects the next/previous preset or snapshot without a bank queue. This is useful if you've programmed a fixed setlist for your show, and just want to increment through all your presets or snapshots. You can also cycle through all three switch types by pressing and holding both the and switches for two seconds. At any time, press and hold both FS1 and FS7 to cycle through BANK / , PRESET / , and SNAPSHOT /. |
Global Settings > EXP Pedals
| Knob | Parameter | Description |
|---|---|---|
| 1, 2, 3 | EXP 1, 2, 3 Polarity | If your external expression pedal appears to work backwards—for example, a Volume pedal block is loudest with the heel all the way down—set this to "Inverted." |
| 4 | EXP 1, 2, 3 Pedal Position | Determines whether the Helix expression pedal positions are recalled per snapshot, per preset, or applied globally. If you want a Volume Pedal or Wah to maintain its position when switching presets, set this to "Global." |
Global Settings > Displays
| Knob | Parameter | Description |
|---|---|---|
| 1 | LED Ring Brightness | Determines whether the Stomp mode footswitches' colored LED rings appear dim when bypassed, or off when bypassed. When playing in bright sunlight, you may want to set this to "Off/Bright" to increase contrast. |
| 2 | Tap Tempo LED | If you'd prefer to not see the FS12 (TAP) red LED constantly flashing, you can turn it off. |
USB Audio
Helix functions as a USB 2.0, multiple-input/output, 24-bit - 96kHz, low-latency audio interface for Windows® and Mac® computers, as well as for iPad and iPhone (with optional Apple Camera Connection Kit adapter), and is compatible with all major DAW software.
NOTE
For USB audio operation on Windows® computers, it is necessary to download and install the Line 6 Helix ASIO® driver (see page 56)
- For Mac® computers, it is only necessary to download and install the Line 6 Mac® Core Audio driver if you desire audio sample rate operation at rates other than 48kHz. These drivers are available from [line6.com/software][https://line6.com/software). There is no driver installation necessary for an Apple iPad or iPhone.
With the Helix default "Multi" Input and Output block settings in use, you'll automatically hear audio software playback on USB 1/2 routed directly to the Helix XLR, 1/4" and Phones outputs. This lets you jam along with YouTube™, iTunes®, or your DAW tracks without hearing them through a bunch of amps and effects.
If you set your DAW software track to record from Helix USB 1/2, you'll capture your Helix-processed input signal in the DAW track - with zero-latency monitoring, since you are hearing your input from the Helix hardware outputs before it is routed through your software.
The additional Helix USB Inputs and Outputs are available within the Helix Input and Output blocks, and within your DAW software track menus, which can be utilized for numerous routing configurations, all without patching extra cables - see the following examples.
Hardware Monitoring vs. DAW Software Monitoring
Use of the Helix default "Multi" settings for both the Input and Output blocks provides hardware monitoring, which allows you to hear your live input signal at all times, independent of your DAW software's monitor settings. Hardware monitoring can be desirable since it allows you to hear your live guitar or mic input with Helix processing added and essentially "latency-free," since the monitor signal is not routed through your DAW software.
In some DAW recording scenarios, it may be preferable to utilize your recording application's "input monitoring" or "software monitoring" feature, which routes your live input signal through the armed recording track, thus allowing you to monitor the input effected by any plug-ins you may have inserted on the track. The one downside of DAW software monitoring, however, is that your live input signal will be delayed slightly due to being routed through the software and back to the Helix outputs, which is referred to as "latency." Helix is designed to provide very low latency operation - see "ASIO® Driver Settings (Windows® only)" for info and settings.
When a DAW track's software monitoring is active, you'll likely not want to simultaneously hear the Helix hardware monitoring signal. To achieve this, you can set the Helix Output block to USB Out 3/4 or 5/6. These Output block options will route your Helix-processed, stereo signal out to your DAW software without also providing the Helix hardware monitoring to USB 1/2. You'll then need to set your DAW track to receive from the same selected Helix USB Out to record the Helix-processed signal into the track - or, you can optionally set the DAW track input to Helix USB 7 or USB 8 to record a dry DI signal - see the next section.
NOTE
Keep the Helix Input block set to "Multi" and your DAW software's main, Master output to Helix USB 1/2 to also hear playback of your full DAW mix.
DI Recording and Re-amplification
A common DAW recording technique is to record a dry DI (Direct Input) signal, such as the unprocessed signal from your guitar, Variax or mic, along with your mic'ed or processed tone. This allows you to process the DI track later with plug-ins (such as the Line 6 POD® Farm Plug-In), and/or "re-amplify" the DI track through an amp or other outboard gear. Helix has handy options built right in for recording DI tracks, as well as for easy re-amplification of DI tracks back through your own Helix tones, all without extra hardware or cabling!
Helix offers two special DI outputs, USB Outs 7 and 8, which appear as available options within your DAW software track input menus. These two dedicated USB Outs are tapped directly from the Helix input sources of your choice. To configure the Helix input source for each, go to Global Settings > Ins/Outs > Re-amp Src (USB 7) and Re-amp Src (USB 8), where you can select Guitar, Aux, Variax, Variax Mags or Mic:
Recording a Dry DI Track
For this example, we'll record guitar into two DAW tracks simultaneously, with one capturing the Helix-processed tone and the other the unprocessed DI guitar.
1. In the Helix Global Settings>Ins/Outs>Page 3 screen, set Re-amp Src (USB 7) to "Guitar" (as shown above).2. Dial in your desired Helix tone, while keeping the Helix Input and Output blocks both set to the default "Multi" setting.3. Create two new audio tracks in your DAW software project:
Create one mono track to record the dry DI guitar, and set the track's input to Helix USB 7.
Create one stereo track to record your full, stereo Helix-processed tone and set the track's input to Helix USB 1/2.
4. Set both tracks' outputs, as well as the DAW Master output, to Helix USB 1/2 to allow all tracks to play back through Helix.
NOTE
Setting the stereo track's output to Helix USB 1/2 allows you to hear your Helix-processed tone via the Helix hardware monitoring while recording. For this configuration, disable software monitoring on all DAW tracks.
5. Arm both these DAW audio tracks, hit the Record button and start laying down your guitar performance!
Now you have your Helix-processed track to hear with the project, and a separate DI track with which you can further experiment at any time with DAW plug-ins and/or re-amping (see the next section).
Re-amping Through Helix
If your DAW software provides options for routing individual audio tracks to outputs other than just the main Helix USB Out 1/2, then you can use these steps for re-amping a dry recorded DI track back through Helix.
1. In your DAW software, set the DI track's Output setting to a Helix stereo USB Out other than USB Out 1/2. For this example we'll use Helix USB Out 3/4.2. Create a new stereo track in your DAW project and set this track's Input and Output both to USB 1/2 - Let's name this track "Re-amped." Arm the track for recording.
NOTE
In some DAW software it may be necessary to also activate the software monitoring feature on this "re-amped" track to monitor the Helix-processed signal when playing back your project. See your software's documentation.
3. On Helix, select the Input block and set it to receive from the same USB stereo pair (USB In 3/4) and keep the Output block set to "Multi." Load your choice of amps and effects on the current Helix preset.
4. Now play your DAW project and you'll hear the DI track "re-amped" through your Helix! Adjust the DI track's volume slider to make sure the signal feeding into Helix is not too hot. Tweak your Helix amp & effects as desired while listening with the playback of your project mix.
5. Once you have your re-amplified guitar tone they way you like it, Solo both the DI and re-amped tracks, rewind to the start of the project and hit the DAW Record button, allowing it to capture the signal into the new re-amped track in real-time.
Allow the DI track to play to the end, stop recording and you've created your new re-amped guitar track!
TIP
Note that you still have your original Guitar DI track, and you can repeat this process to create additional re-amped tracks with different Helix settings, add plug-ins, blend with your original guitar track and more.
ASIO® Driver Settings (Windows® only)
When using Helix as an audio interface for Windows® DAW applications, it is highly recommended to configure the software to utilize the "ASIO®" Helix driver. The Line 6 ASIO® driver offers the superior, low-latency audio performance required for DAW recording. This driver selection is typically found in your DAW software's Preferences or Options dialog - see your software's documentation.
NOTE
Download and install the latest Line 6 Helix ASIO® driver from line6.com/software.
Once the ASIO® Helix driver has been selected in your DAW software, you'll also see a button in the same dialog for "ASIO® Settings" (or with a similar title). Press this button to launch the Helix Control Panel, which is where you make the following Helix driver settings.
- Sound Control Panel - This button launches the Windows® Sound Control Panel, which is where you can optionally configure Helix to be the audio playback device for multi-media applications (such as Windows® Media Player, iTunes®, etc.) These settings are not relevant for your DAW software, since these applications utilize the standard Windows® driver.
- Default Bit Depth - Select the Bit Depth at which Helix will operate for recording and playback with your DAW software. 24 bit or 32 bit are recommended for quality audio production.
- ASIO® Buffer Size - Your goal is to achieve the lowest latency possible in your DAW software, but with glitch-free audio performance. Smaller buffer size results in lower latency, however, also increases the demands on your computer, which can result in clicks, pops or other audio artifacts. Start with a lower slider setting here and, if you encounter audio performance issues, come back to this panel and move this slider to the right incrementally to remedy the problem.
Click the Apply and OK buttons when your Helix Control Panel settings are complete to return to your DAW software. Please also refer to your DAW software's documentation for more about its own specific audio device, buffer and project settings.
Core Audio Driver Settings (Mac® OS X only)
To use Helix as an audio interface for Mac® applications, it is not necessary to install any additional driver. Helix will utilize the Mac® computer's "Class Compliant" USB driver automatically simply by connecting to your USB port. Helix will then appear as a selectable Core Audio device within the Mac® Utilities > Audio MIDI Setup panel and/or directly within your audio and multimedia applications. However, note that this Apple Class Compliant driver offers strictly 48kHz native sample rate operation. If you prefer to use a different native sample rate (or if your particular DAW application requires it), you can optionally download and install the Line 6 Mac® Core Audio driver from [line6.com/software][https://line6.com/software). This Line 6 driver offers 44.1kHz, 48kHz, 88kHz or 96kHz sample rate operation.